Verified Review: “My son always says, “You get what you pay for.” In other words, if you pay less for something, you get less. This could be less in terms of features or less durability or less tech support or shorter warranty period, etc. Well, my recent experience with robot vacuums disproves his theory.
Bad Choice Purchase. Recently, I purchased a name brand, top-of-the-line robot vacuum for over $1000 including discounts. On paper, it sounded perfect and included vSLAM mapping technology (I was not yet aware of lidar mapping), and a completely separate mopping unit. After attempting to use it for a couple of weeks, I returned it.
It did a lousy job of mapping and the mapping took days, and it never did a complete job. Some areas of the house were skipped and I found it impossible to force it to map those areas. All I could do was start over and hope it mapped it on the second attempt, but, alas, it did not.
The map itself was very rough and made it impossible to see straight walls. This vacuum never did do straight lines and appeared to move about randomly while vacuuming. For me, the killer was when I found the vacuum couldn’t handle carpet.
It kept getting stuck, and when it did, I could hear it spinning its wheels. To free itself, it would turn in a tight circle leaving a string of circles all the way down the carpet. When it was able to go in a straight line it did so in a jerky fashion as it got stuck, got free, got stuck etc. I figured at this rate it would burn up its motor while it ruined the carpet. Consequently, I returned it to the vendor where I had bought it.
Research-based Purchasing. I decided that I needed to do more research before buying a replacement robot vacuum. I created a spread sheet with all of the attributes of each vacuum. I also included reviewer rating scores and read numerous reviewer comments making certain that I read comments from each rating category for each vacuum. I picked out a set of attributes that I wanted the selected vacuum to have and culled down the group of vacuums to only those that had them.
I noticed that the Laresar L6 Pro had the highest reviewer rating of the group. It received a 4.6 out of 5.0, while the next highest was 4.4 out of 5.0. The vacuum I returned had received a 3.9 out of 5.0. I guess I should have paid more attention to such details.
I began reading the long list of reviews and was even more impressed. Almost all of the viewers had nothing but strong praise for all aspects of the vacuum and the few that had any negative comments were regarding trivial problems. The more I read, the more impressed I was with what the reviewers were saying.
In comparing the Laresar to all of the other vacuums on my list, it was clear that the Laresar was the clear winner due to its features and reviewer ratings and comments. Incidentally, I had never heard of the Laresar brand before, and when reading articles such as “The ten best robot vacuums in 2022” and similar titles, Laresar is never mentioned. That’s too bad, because in my opinion it is the best regardless of cost on the market. I’ll tell you why, next.
Lidar vs vSLAM. One of my requirements is that I would only consider vacuums using Lidar mapping technology. Lidar is hands-down better at mapping your house. It is both faster (much, much faster) than visual mapping (vSLAM) and much more accurate than vSLAM.
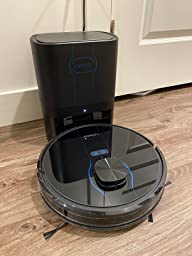
While vSLAM requires multiple whole house scans with each one pretty much taking all day to build a map, the Lidar mapping takes only one full house scan to complete an accurate map. I should mention that both Lidar and vSLAM continue to make improvements to the map each time you vacuum. The Laresar L6 Pro has a high-capacity battery that lasts more than 2 hours, so it can complete a quick and accurate scan of most houses on a single charge. In fact, when I first plugged the Laresar into its charging station it scanned and built a map of the room it was in while it was charging. Consequently, I was favorably impressed pretty much right out of the box.
House-map Modification. In the process of building the initial map the Laresmart App automatically divides the map into rooms at what it considers to be natural points of division , and it names the rooms such as room 1, room 2, etc.
After the map (first figure above) has been created, the Laresmart App has a feature that allows you to modify the map by renaming the rooms to more familiar names such as kitchen, master bedroom, etc. It also allows you to merge rooms into one or to divide large rooms into multiple smaller rooms.
You can also create invisible walls, keep out areas, and special vacuum areas. I used an invisible wall at the doorway to my office (bordering room 7 on the left), because I didn’t want the vacuum going in there and getting tangled up in the computer related cables and wires and all the other junk I have in there. I wanted to be able to keep the door open so that it didn’t get too warm in there, so the invisible wall was the solution.
I also installed a small keep out area in a corner of the family room that my wife uses as a charging station for her iPhones and iPads etc., and another one on the right side of room 7 closing off the closet doorway from the master bath. I should add that all of these modifications worked exactly as designed.
Note that the current map shows the most recent cleaning pattern. In the map represented by the first figure. the rectangle showing the vacuum path illustrates a spot cleaning in the upper part of the yellow Dining Room area.
Room 7 at the very top of the map was not actually mapped, but the vacuum lidar got a glimpse through the door opening of my office on the left side and one of the closets on the right side before I shut the doors in each location before it was able to get into the rooms.
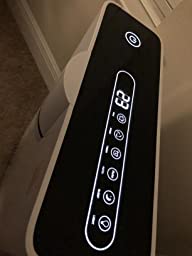
Scheduling. Another handy feature is “Timing.” This is an amusing misnomer for “Scheduling.” It allows you to schedule the robot to clean somewhere at a certain time and day. You can make this a one-time schedule or a repeating schedule. For example, I scheduled it to clean all of the rooms containing carpet on Saturday mornings. To do this, you select the day and time and whether it should repeat and how often. When you click “cleaning position,” which refers to which rooms should be cleaned, your house map appears. You simply click on the rooms that should be cleaned. I’ve tested this and it works perfectly.
Suction. The Laresar features suction strengths labeled “quiet, standard, strong, and maximum.” My wife keeps a pretty clean house, so it is hard to see a difference between the different suction strengths, but using the Laresmart App to switch between the different strengths does make a difference in the sound levels.
I used the “quiet” strength to map the house. This maximized the battery time making it more likely the vacuum would compete the mapping before the battery ran out. Even while vacuuming in the “quiet” mode, I noticed that the vacuum picked up any little bit of material that was not a part of the floor or carpet.
I haven’t tried throwing Cheerios or something else on the floor to see how well it picks it up, but I have watched a number of videos in which the Laresar was tested in this manner, and it did very well in those videos. Consequently, I did not feel it necessary to duplicate those tests.
Systematic Cleaning. Regarding vacuuming, the Laresar L6 Pro seems to use a systematic method. It first vacuums all the way around the perimeter of a room. Then it fills in the area within the perimeter by vacuuming in straight rows. It displays this pattern on the app, so that you can see that no areas have been missed. I really like this feature, because it increases my confidence that the robot is doing a really good job of completely covering the area. Incidentally, the rows are all parallel throughout the entire house (see the second figure above.)
Whenever the Laresar finishes a “job” it goes directly back to the charger taking the most direct route. I’ve never had it run out of battery before finishing a “job,” but if it did run low on battery, it would go back and charge and when it was finished charging, it would finish the job.
As I mentioned, I haven’t experienced a case where Laresar ran out of battery, so I’ll just have to take their word for this. If nothing else, this confirms that the Laresar has a high-capacity battery.
Incidentally, I should mention that the Laresar ran for 151 minutes on a single charge in completing its initial mapping run with the vacuum suction set to “quiet.”
Mopping. The Laresar also does “mopping,” which consists of a light spray of water and then dragging a mop pad over it. This is similar to most other vacuums that do “mopping.”
If commanded to do so, it can sweep a spot and then mop it, sweep then mop, etc. until it has finished a room or area. It also can be set to mop using a “y” pattern. I don’t know what the purpose of this is and didn’t consider it important enough for further investigation.
Since I have hardwood floors that do not allow spraying with water, I do not plan on using the mopping feature and also did not test it. A number of other reviews did test it, and it seemed to work well considering what it was doing.
Records. The Laresmart app keeps a record of each time the vacuum goes out and cleans (see the third figure above). It maintains a running total of cleaning area, cleaning times, and time spent cleaning. For each cleaning episode, it also provides the cleaning time, the area cleaned in square meters, and the time of day. Click the right arrow for the cleaning episode and it shows the date and time and the house map with the cleaning pattern taken by the vacuum.
Emptying the Dust Bin. The Laresar L6 Pro includes self-emptying of the dust bin. The Laresmart app allows several options regarding the frequency of emptying. I selected the option of emptying the dust bin after every cleaning. The central depository for the refuse collected by the vacuum, which is located in the charging station, should allow me to go about 60 days without having to change collection bags. This is similar to several other robot vacuums. I did not see any vacuums that allowed for a greater volume of vacuum debris and many of them were smaller. It is obvious to me that the amount of time it takes to fill the storage bag depends on how clean or dirtty you house normally is.
The debris bag is cleverly designed so that when you pull up on the tab to remove it, it closes the opening thereby keeping the dust from entering the room.
Purchase Cost. Interestingly, I did not care so much how much the vacuum cost as long as it did what I wanted. My son’s philosophy of buying the most expensive item in order to get the most capability or best quality is sometimes valid – but it was way out-to-lunch in this case.
I thought the Laresar L6 Pro turned out to easily beat out the competition, while simultaneously having the lowest price tag. While the list price was around $600, I was able to get a coupon discount that dropped it to $400 on Amazon. It was a good buy at $600 and at $400, it was a steal – in my humble opinion.
The Cons. I have only one complaint regarding this excellent robot vacuum, and that is that the documentation that comes with it is woefully lacking. For the most part, I found it necessary to sort of stumble around until I could figure out what a setting was supposed to do or what features were available to me. I also found that other reviews, which were all excellent, were very helpful in discovering how to use this vacuum cleaner.
It was quite apparent that English was a second language for the developer of the Laresmart app with a number of features being given somewhat amusing names. For example, “scheduling” was called “timing” and the dust bin emptying frequency was called “Dust collecting treasure.” I’m not sure if this was an attempt at humor by the developer or if the person has an alternative meaning for treasure.
There were several other amusing terms used in the documentation that I don’t recall right now. Also, explanations of what the settings are and what they do were no where to be found. In many cases, they were pretty much self explanatory, perhaps that explains why there is so little documentation. I guess if I can figure it out, pretty much anybody can, but I was so positively impressed by the functioning of this vacuum that I would consider writing a manual for Laresar.
All in all, the inadequacies of the documentation is a very minor concern to me, because I was able to figure it all out in the end.
Summary. Having had a bad experience with a major name-brand, top-of-the-line, expensive robot vacuum, I was determined to find one that would do everything I wanted it to. The Laresar L6 Pro filled the bill for me by meeting all of my requirements and then some.
I wanted a vacuum with the following features, on which I would not make any compromises. These items should also be considered “Pros” of the Laresar L6 Pro.
Self-Emptying Dust Bin with Minimum 60-day-capacity Reservoir
High Capacity Battery that Lasts More than 2 Hours
Lidar Mapping Technology
Editable House Maps including Room Naming, Merging or Splitting of Rooms, Invisible Barriers, Keep-out Zones, Special Vacuum Zones
Vacuum Tracking Patterns Showing Areas Vacuumed and Coverage
Allows the Selection of Which Room or Rooms to Be Vacuumed
Scheduling by Room, Zone, or Auto (Whole House) by Day of Week, Time of Day, and One-time or Repeated Daily or Every Week or Month
Spot Cleaning
Selectable Suction Levels
Go to Dock Command
Allows the Location of the Docking Station to Be Moved Without Remapping (not tested)
As indicated, that last item was not tested and should be classed as desirable but not mandatory. Also, this item was not used to cull the list of candidate vacuums.
The Laresar L6 Pro had one “Con” and that was inadequate documentation for both the vacuum and the Laresmart App. My overall rating for this vacuum is 5 Stars plus.”
Verified Review: “I’ve been using this little microcurrent foreo bear for about 2 weeks now and I am hooked. I have used the Nuface device a few years back, but gave up on that due to the fact that it would not hold a charge very long and just stopped working all together. Since receiving the Foreo Bear, I charged it once and two weeks later it is still going strong with the same charge. I love that a treatment is only 2 minutes long and you can follow the app that gives specific instructions. I mean who doesn’t have 2 minutes? Treatments are so short that after using the app, I will do another treatment on specific areas of concern. Does it work? You betcha, you can instantly see a lift in the eye area and my cheekbones are well defined. It’s a little workout for your face. Love my foreo bear.”
Verified Review: “Order: Arrived faster than I expected and in good condition.
ME: Middle age male, ~5’11”, 200 lbs, very fit – gym 6 days/week (weight lifting, cardio), walk 15 miles/week. Office worker, not a fitness professional.
IMPRESSION/USAGE TO DATE: Solidly built and heavy (a good thing). Documentation is easy to follow. I’ve used it twice (2x). 1) Evening to “relax” and circulation – 3D vibration at lowest level program. 2) Next morning after a heavy weightlifting “leg” workout – same purpose and setting. Both sessions: very smooth movement and very quiet. Even at the low setting, I was very surprised at how much the vibrating transmitted up my legs – a lot more body movement that I was expecting (good thing). Also, seems to engage the abdominals more than I anticipated (good thing).
REASON FOR PURCHASE: Based on my reading, this platform has all the vibration variations currently being discussed in articles found on the web (i.e. 3D, horizontal, and vertical) with frequencies/amplitudes recommended). Ability to adjust speeds, amplitudes, etc… Platform size width/length. Some of their other models have reviews but, this one did not. I decided to take a “chance”. I was able to find the company’s website – made me a bit more willing to take the chance.
MY GOAL: Improve/shorten weightlifting workout recovery. I was primarily interested in the possible circulation benefits of “vibration platforms”. Heavy weight leg workouts have always left me sore for days (decades of lifting) and when I have been using the foam roller on my calves, my feet feel much better (circulation?). I’ve experienced some benefits with vibration therapy (my version) using a vibrating foam roller (i.e. sitting upright in a chair, calves vertical to floor with heals of my feet on the vibrating roller). So, I decided to try this platform.
RESULTS (thus far): Based on just two (2) sessions of 10 minutes each (not a lot yet), results are promising! Session 1 at night – very relaxed and slept better than normal. Session 2 morning after leg workout – no leg soreness thus far which is a huge improvement for me. I sit at work and normally, on a leg lifting day, after sitting for 1-2 hours, I’m very sore. NOT TODAY – 7 hours since leg workout and have been sitting for 2-3 hours already today. Unexpected, mild, abdominal firmness not quite soreness – will be interested how it hits the abdominals at higher settings (I do some form of “standard” abdominal work 6 days per week).”
Verified Review: “So, just to preface for the folks who are looking for a review from a similar lived experience: early 30s here, bachelor, lives in a fine downtown urban apartment but lacks dishwasher, had been manually doing dishes by hand for almost 4 years.
This thing is outstanding. For starters, its practically plug and play. Aside from making sure the drainage tube is secure and facing a bucket properly, this thing pretty much was ready to go from unboxing. Not a whole lot of thinking required for that part (cut the protective tape, of course, but that actually is more than you’d think). If you’re like me and you’ve had a dishwasher before then went an extended time without it, this will feel like meeting an old friend. It won’t matter that it takes a couple trips to the sink to get the water up to the level it needs to start a cycle, you will GLADLY take that over those days you kicked the dishes to the next day until it became a beheomoth and you took an hour just to clean them so you could keep your sanity. It will take you 3 minutes, tops, to fill the unit with enough water. Then, press a button and its just like having a normal washer and dryer. The water drains pretty cleanly and with good pressure. Just make sure its secure when it starts. Mine needed a bit more reinforcement the first go-round and did spray a bit, but I caught it early and should be fine moving forward.
Look, just buy it. I was looking for the best value – cheapest that wouldn’t need to be replaced anytime soon and had sizable enough capacity to make doing a single person’s dishes manually a thing of the past. I wanted something that could handle a few plates, a few cups, some silverware, a pan maybe and a couple bowls. I wanted to stop feeling like two uninterrupted meals in a day resulted in an unholy amount of dishes to be cleaned afterward. This machine did that. In one day.
All it needed to do was prove 1) it worked like a normal dishwasher (cleaned with pressure, didn’t require extra effort than would otherwise be needed on a normal dishwasher), 2) it could handle a couple meal’s worth of dishes from a single person cooking at home and 3) it didn’t increase my water or electricity bills. It checks all 3. When people say its a lifechanger, I mean it quite tangibly – after 4 years in the same apartment, I finally feel like my place is complete and Ive lived in a lot of places. With this small addition, I feel like I finally have the perfect place.”
Verified Review: “I currently travel with two Asus usb monitors (1080p) and while they’re not bad, they’re not great with the color, viewing angle, and the resolution. I program quite a bit and my home setup I have 3 pretty big 4k monitors. So when traveling and using this tiny 13” screen on my surface book 1 it was always very painful.
On my last trip I hopped on Amazon to see if there are any upgrades for my usb monitors because it was getting irritating not having something with a better resolution and then I found this one. There were a couple others I looked at too but this one had more reviews that looked like actual legit reviews and overall people were pretty happy so I had this sent to me at the hotel. Unfortunately I wasn’t able to get it until the last day of my trip but I will say I was extremely surprised at how well it worked. To boot it had touch controls which I’ve always enjoyed having on my surface book.
I liked it so much in fact that when I got home instead of putting it my travel electronics drawer where I keep all the cables and my two asus monitors I store until my next trip I decided to add this guy to my current 3 monitor setup. My primary setup doesn’t have a touch screen and for some meetings where I illustrate things online having a touch screen is awfully nice.
My two main complaints which are minor are: 1) with Windows 10 this monitor has to be your primary screen. I thought it was an issue with this monitor with something buggy in the device, but found that it’s actually a windows problem. If you have a second screen connected to your setup where one is not a touch screen and connect an extra screen that does have touch enabled – the touch inputs will only be registered on what is identified as the “primary monitor” in your multi-screen setup. It’s stupid but it’s on Microsoft not UPerfect. 2) would be nice to have a travel case to protect it. UPerfect will send you a case to protect it if you ask them for it which is nice (mine is on the way) but I think I would have preferred it to come with it. They give you color options which sure is ok, but I think I still would have liked to have a black one in there by default. I don’t know how nice it is, the one that came with my ASUS MB169B+ was pretty decent and probably saved it a time or two when someone wasn’t too gentle at the airport. I was pleased to find that this one fit pretty nicely into the case I had for my ASUS monitor so I might actually swap the cases once the one from UPerfect arrives if I think the asus case will do a better job.
Both these cons weren’t a big enough issue for me to knock down any stars so overall I’d say this was still a great buy. I’m hoping it lasts a long time as it was an investment, but so far the people at UPerfect seem to be very responsive (questions were answered usually within hours of me asking).
One last side note too – I was able to get this to work via the Microsoft dock connector 2 via the USB-C port. I was very happy to see it work like that since the surface book 1 didn’t have a usb-c port. If I’m not using the dock I used the usb-a -> usb-c cable and then a hdmi -> mini display port connector (make sure it supports 4k display) and it worked great.
UPDATE 2020-11-18 Just thought I would update that I still am loving this screen. I use it in my primary setup now and love it. The hinge is doing great and hasn’t become loose or anything which I was initially nervous with. I love this bringing touch screen to my primary setup. Even from just having my music playing and my Outlook open so that I can instantly touch it to see something new that came while still doing the programming and other stuff I do on my other three screens. The cover they sent me was ok, it will protect it from scratches but once this COVID stuff stops and I start traveling, I think I’ll likely be just using the case my previous USB Asus monitors came with since that one is a lot stronger and would stop something from puncturing the screen and deter even it getting bent in my travel bag. Again, fantastic device and I recommend it for everyone who could use a travel screen or primary touch screen.
UPDATE 2021-05-25 – ** How to have non primary monitor be the touch screen ** Still super happy with the monitor. I use it now for my main home setup and take it whenever I travel. I thought I would add instructions for those who want to use it as a secondary monitor and still have touch controls on Windows 10. By default, to have touch controls enabled you have to make it the primary monitor or else touch controls will actually react on your other screen instead of the intended touch screen. To get around this: 1) Set whichever screen you want to actually be your primary screen (assuming this is not the touch screen) 2) Go to the cortana/search bar and type “calibrate the screen for pen or touch input” and press enter. 3) The “Tablet PC Settings” window should pop up now, on the top portion (‘Configure’ section) of the display tab click “Setup” 4) This is going to turn one of the screens white with a little bit of explanation text. You can read the text but essentially you need to hit the enter key a time or two so that the white screen background with message moves to your actual touch screen. 5) Once it’s on the touch screen, then you touch the screen somewhere and presto, now you can have your touch screen not be the primary monitor. Hope this helps!”
We independently compile product reviews, good as well as bad ones. When you buy through our links, we may earn a commission. Help us stay independent.